|
|
How to Make Vinegar:
The Continuous Barrel Fermentation Method
To make vinegar you only need wine, air and time. However, this is a fun set-up to make a continuous fermentation in a barrel which will supply you will years of delicious homemade wine vinegar. If you are hosting wine tastings or wine dinner parties, you will likely have leftover wine. Don't throw that delicious stuff down the drain! Use it make delicious vinegar!
Unlike making vinegar in a single shot in a jug or crock, this method allows you to add wine periodically and to remove vinegar periodically both to test its progress and to use. When learning how to make vinegar in this way, you'll see that you produce vinegar which is much better than any basic wine vinegar you can buy in a market. It is richer in flavor and more aromatic. And they even improve as they age, just like a fine wine, gaining in complexity and finesse. To make these vinegars into flavored vinegar, see our How to Make Herb Vinegar page.
This is the traditional method to make vinegar that is used by rural households throughout Europe. Almost all French farmhouses, cooks and wine makers have a vinegar maker in their home. I learned the basic technique from Richard Olney's classic book, "Simple French Food" but have adapted it to my uses as I've gained experience with it.
What you will need:
- A wood barrel or large crock with a spigot at the bottom: Ideally, you want a wooden barrel, usually made of oak, of about 1 to 5 gallons. These can be bought at a wine making supply shop. Paraffin-line barrels are fine but will not impart any wood flavor. Otherwise, you can use a used barrel. If you use a new barrel, wash it thoroughly and fill with hot water to get rid of some of the wood char flavor. Otherwise your first batch or two will be quite oaky flavored. Alternatively, you can use a non-reactive crock made of glass or earthenware as long as the interior surface is a non-reactive material. It should also have a working spigot at the base of the container. The spigot and all parts of the fermenter should not be made of metal (particularly aluminum) because the acid in the vinegar will react with metal and can leave metallic flavors in it!
- Power drill with large drill bits
- Wooden spigot: The largest that will comfortably fit in your barrel. Too small and they take a long time to drain and can clog easily.
- Cheesecloth
- Tape
- Left-over wine: While you can buy wine specifically to make vinegar, you don't have to. Instead, when having wine tastings or dinner parties collect the left-over wine. Put it in bottles, filled up to the top and then corked, until you add it to your fermentation vessel. You can even use wine left over in glasses or a dump bucket, just filter it lightly through cheesecloth. If you are worried about contamination you can always heat up the wine somewhat, but boiling will boil off the alcohol which is what is converted into acetic acid. The better the wine you use when learning how to make wine vinegar, the better the vinegar you will make. You don't need to use very expensive wine but try to avoid using very cheap wine. Some people ask if you can use flawed wine, such as wine which is corked (containing TCA contamination). I would avoid using anything that you wouldn't drink. It is likely to add strange flavors or aromas to your vinegar as well. You can use red and/or white wines. If you want a completely white vinegar then you should only use white wines. Do not use sweet wines as the residual sugar can introduce other contaminants. It is best to add and remove wine from the fermenter in larger portions but we have added glasses at a time as well and it seems to work fine.
- Vinegar Starter ("Mother of Vinegar"): You can buy mothers in most home brewing and wine making supply shops. Alternatively, you can take a piece of one from a friend who makes vinegar. If you have an old bottle of vinegar which is half full and has a slimy looking mass in it, you can use that as well. Basically you want anything that will inoculate your wine with the vinegar making bacteria. If all else fails, you can make vinegar without a mother starter, the bacteria will inoculate the wine on its own from the air. However, this is less consistent and may take a long time. To get a good clean start, find a starter mother.
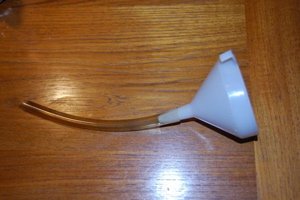
- Two plastic food-safe funnels: They should be small enough to fit into the bung-hole at the top of the barrel (the hole on one side of the barrel with sits at the top and is there things are added to the barrel) and into a wine bottle.
- Plastic tubing: Only use food-grade tubing to make vinegar. It should be thick enough to snugly fit over the bottom of the funnel. It should be long enough to reach from the bung-hole of the barrel down to the bottom side of the barrel (the width of the barrel).
How to Make Wine Vinegar:
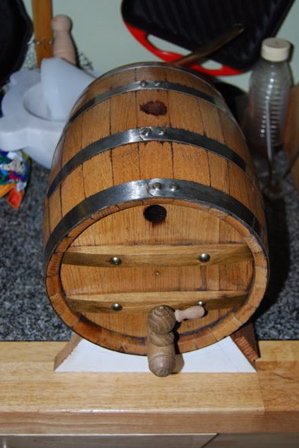
- First, before you make vinegar, you need to prepare your barrel. As seen below, you should have a bung-hole at the top side of your barrel. This is the only hole that is usually present when you buy a new barrel. It is the one visible at the upper side of the barrel in the picture below. Be sure this hole is big enough to fit the neck of your funnel with the plastic tubing over it. Next, you will need to drill three other holes. On the front, flat side of the barrel, pictured below, you should drill one hole at the top end and one opposite it on the bottom end where the spigot will go. Both holes should be as close to the edges as you can. The third hole is opposite the top front hole on the back, flat side of the barrel. These two top holes are to allow air into the barrel since vinegar bacteria need oxygen to convert alcohol into acetic acid. They should be big enough for ample air to get inside but not so big as to take up the whole side of the barrel so there is no room for wine! The spigot hole size should be based on how big your spigot is. A bigger spigot is advisable because the vinegar will flow quicker and will not get clogged as easily.
- Install your spigot by pushing it firmly into the hole you drilled. Next, with a wooden mallet, or with a piece of wood protecting it from a metal hammer, firmly tap the spigot into place with the barrel up on its end so that it is secure and water-tight.
- Next, we recommend priming your barrel by filling it through the bung-hole with boiling water before you make vinegar. This will help to sterilize the barrel and wash away any dust or sawdust. Let it sit over-night at least. You may find that the barrel leaks initially. This is pretty normal with new barrels or barrels which have been unfilled for a while. Let it soak and as the wood swells the pieces will fit together more snugly and the leaking should stop. Make sure it is completely free of leaks before moving on to filling with wine.
- Drain completely and then add a half-bottle to bottle of good boiling vinegar. This also helps sterilize and get rid of any cultures which are not vinegar safe before you make vinegar.
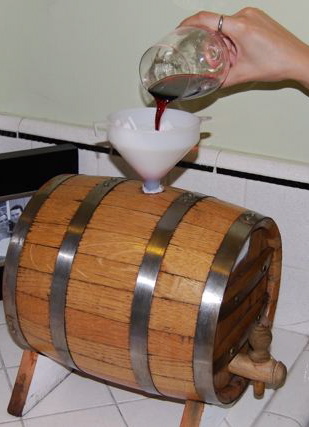
- Attach the tubing to one of the funnels securely. Cut the other end of the tubing on a bias so that it won't stop up against a side of the barrel. Make the length so that when the funnel is in place, flush into the bung-hole, the end of the tube will be down by the inside, bottom side of the barrel. Alternatively, you can use a glass funnel with a long neck that will serve the same purpose. The reason for this is that you want to be able to periodically add wine through the funnel. If it lands on the surface of the mother floating on the vinegar, the mother will sink and become inactive. With the tubing below the surface, you can add wine to the bottom and the mother simply floats up as you fill your barrel.
- Insert the tube into the bung-hole until the funnel is flush with the top of the barrel. Also, cut out small pieces of cheesecloth or other mesh screen to cover the upper holes on the front and back sides of the barrel. Secure them with tape as seen below. These should be layered enough to prevent fruit flies and other small bugs from getting into the barrel. However, they should be open enough so that air can pass freely in and out of the barrel through these holes.
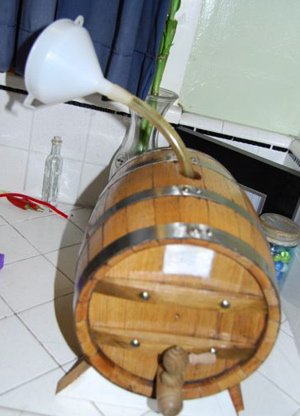
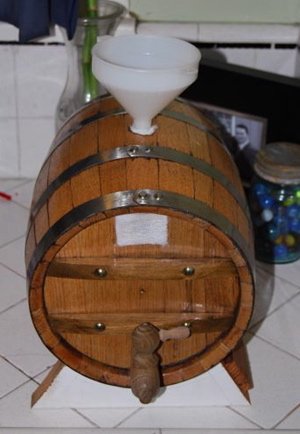
- When the vinegar maker is complete, it will look like this below, with the funnel in place, the spigot closed below, and the end holes covered with mesh. Also note that extra cheesecloth or cotton should be squeezed into the bung-hole around the funnel neck so that there is no open space there.
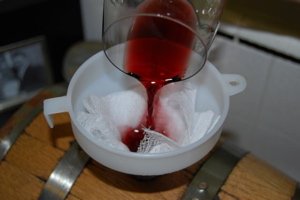
- Now you are ready to start adding wine to make vinegar. First, add your vinegar starter culture or piece of mother if you have one. If not, just add a bit more good vinegar. Next, add wine you have collected, filtering it through several layers of cheesecloth into the funnel as seen below. It is best to start off with a good quantity of wine to make vinegar, at least a bottle-full.
- When you are done with each addition of wine, gently clean out the funnel with a piece of paper towel and then stopper the hole with a piece of cheesecloth or cotton. This will help prevent attracting fruit flies while you make vinegar.
- Now the magic begins! Set the fermenter in a place it can sit undisturbed. You want it to be at about room temperature (about 70 - 85° F). Cooler temperatures will slow the reaction down and the wine will not be converted to vinegar quickly. A layer of bacteria floating on the surface of the wine will slowly form, leading eventually to a thick, leathery and shiny "mother" which you cannot see since it is in the barrel. This is normal and actually desired when you make vinegar. It is that mother that is taking in oxygen and converting the wine alcohol into vinegar acid. If the mother is disturbed and sinks to the bottom it becomes inactive. A new one will form slowly but you ideally want to protect it and keep it floating on the wine. So do not disturb or shake the fermenter once you have set it up.
- In about 8 to 10 days, add more wine. It is best to add periodically in large batches, so add another bottle or so you have collected. Every 8 to 10 days continue to add wine. We have occasionally added smaller amounts in between larger additions and this seems to be fine as well. Watch the level of wine in the barrel, as if you add too much it will start pouring out of the upper side holes! One way to judge this is to hold a flashlight up to the back hole while looking through the front. While it is hard to see through the mesh covering the hole, you can usually see a reflection of the light off the surface if it is getting close. Otherwise, remove the mesh briefly to peak inside, being careful not to allow any fruit flies to fly in!
- To make vinegar, continue adding wine until full or until a few months have passed, whichever comes first. When a few months have passed, start checking the vinegar. You can use the spigot to remove a small bit of vinegar into a glass to smell and taste. It is ready when it is acidic enough to your taste. If you want a very strong vinegar, leave it longer; if you want it milder, don't wait as long. The nice thing about this method to make vinegar is that it allows you to add wine periodically rather than all at once and it allows you to taste the progress along the way so that you can harvest your vinegar when it is best to your taste.
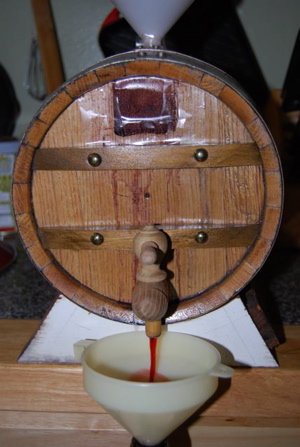
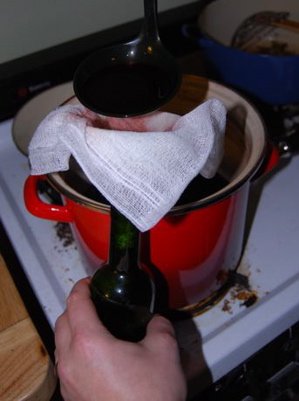
- While you make vinegar you can use small amounts of the vinegar periodically from the barrel, but I recommend "harvesting" vinegar in large batches after your barrel is nearly full and reaches the strength you like. When it is ready, simply drain off a large portion of vinegar through the spigot. We use the other funnel in a wine bottle to do this collection as seen below. Leave enough vinegar in the barrel that your tube is still likely under the surface and your mother is still floating inside on a bit of wine. You can then immediately start adding more wine to build up your next batch.
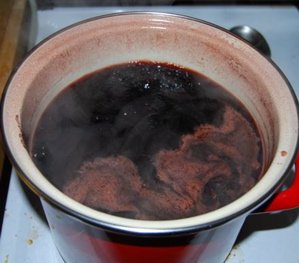
- As mentioned above, after you make vinegar, you can use it immediately, but we recommend a few additional steps to really make it even better. Boiling the vinegar at this point serves several purposes. For one, it sterilizes the finished vinegar. It also boils off any remaining alcohol which may be present. Finally, and most importantly, it boils off water, reducing the vinegar and concentrating it. This can take a lightly flavored or bland vinegar and pump up the flavors and aroma, making it much more powerful and bold. When you make vinegar, this step really makes the difference between a good and great vinegar! We like to take a large amount of fresh vinegar and boil it down to 3/4 to 1/2 the original volume. Be sure to use a non-reactive pot such as an enameled or earthenware pot that won't react with the vinegar acid.
- To make vinegar with herb flavors, after boiling, you can add herbs to the hot water to infuse the vinegar with herb flavors. To learn more about making flavored vinegars, see our How to Make Herb Vinegar page! Cover the vinegar and let it cool to room temperature before bottling.
- Clean several wine or other glass bottles thoroughly. Using the other funnel lined with several layers of cheesecloth or a coffee filter, filter the vinegar into your bottles. Some people like to add a capful of hard liquor such as vodka or kirsch to each bottle to help stabilize it but this is not totally necessary. Cap the bottles securely with a cork or other tight-fitting closure.
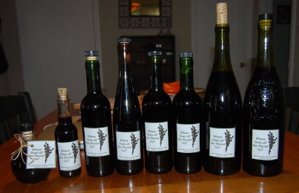
- Your wine vinegar is ready to use but will actually improve in bottle for some time, even years, gaining in complexity and mellowing out into a smoother texture. As it ages in bottle it may throw some sediment which will coat the inside of the bottle. This is normal. If the sediment bothers you simply filter it before use.
- Continue to make vinegar by the same method. Simply add more wine to your now almost empty barrel. Add periodically like you did the first time, until the vinegar is ready to taste again. Then simply harvest more vinegar and bottle however you like. In this way you can continue using the same mother to ferment vinegar for many cycles. As long as you keep your barrel clean and the fruit flies out it can last you even dozens of cycles before you need to clean it out and start again.
- If you do decide to start over, clean out the barrel thoroughly, using lots of hot water to get rid of any sediment and pieces of built-up mother inside the barrel. Follow the same instructions to get it started again. If you are not going to use the barrel for some time, do not leave it empty, fill it with water. If left empty the wood will dry out too much and may become so leaky that it will always leak even if you soak it later on.
For instructions on how to make wine vinegar in a single shot, in a glass jug or crock, see our Making Vinegar in a Glass Jug page. Also, if you want to make flavored vinegars like herb vinegar, see our How to Make Herb Vinegar page for instructions and tips.
Are you done learning about How to Make Vinegar in a Barrel?
Return to the How to Make Vinegar homepage.

|
|
|